
How to Make the Best Beef Pot Pie in 5 Simple Steps
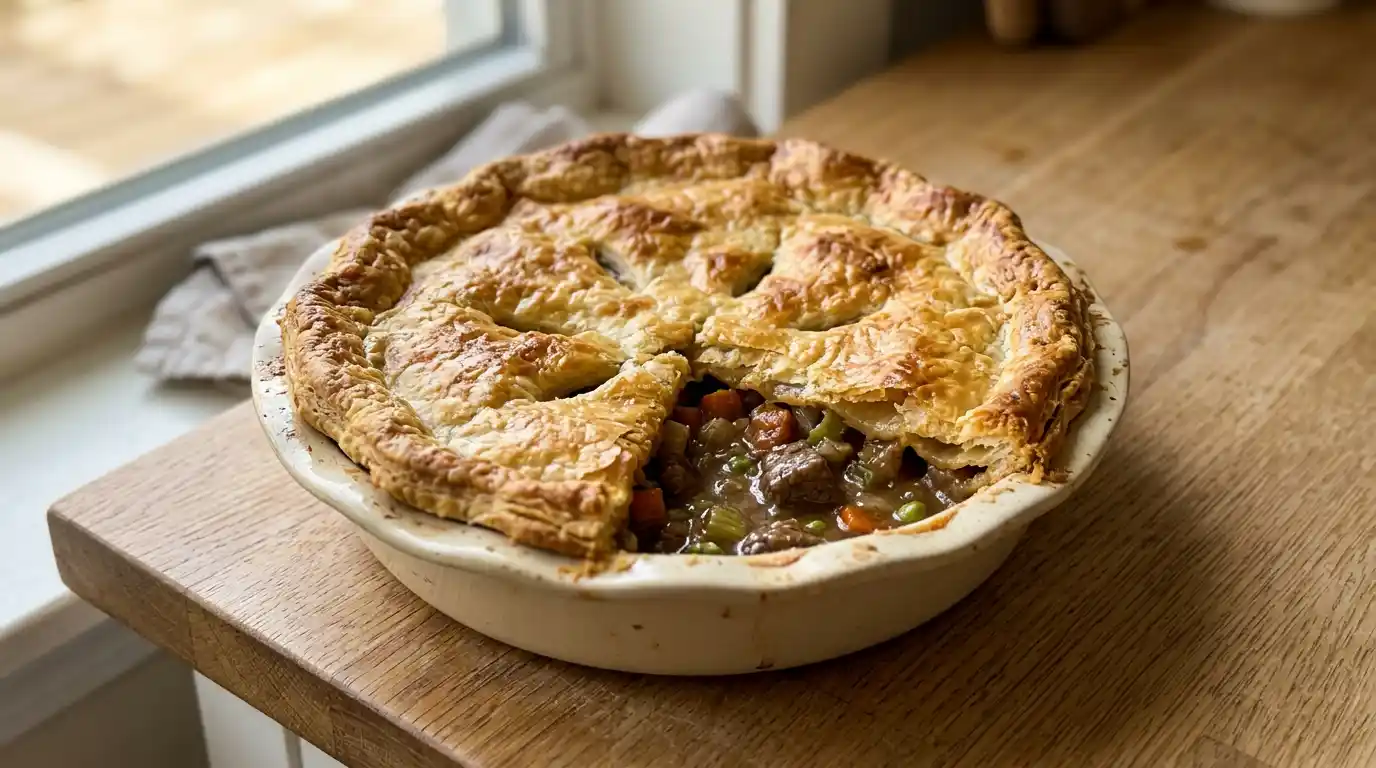
Picture pulling a golden-brown, bubbling Beef Pot Pie from the oven, the flaky crust glistening with butter and the savory aroma filling your entire kitchen. This ultimate comfort food combines tender chunks of beef, hearty vegetables, and rich gravy all wrapped in a buttery pastry that shatters perfectly with each forkful.
This classic dish transforms simple ingredients into something extraordinary that brings families together around the dinner table. Moreover, the recipe is far more forgiving than you might think, making it accessible even if you’re not an experienced baker or cook.
In this comprehensive guide, I’ll walk you through every step of creating restaurant-quality Beef Pot Pie at home, from building deep flavor in the filling to achieving that perfectly golden, flaky crust that makes this dish so irresistible.
Table of Contents
What is Beef Pot Pie
Beef Pot Pie is a savory baked dish consisting of tender beef chunks and vegetables in a rich gravy, all enclosed in a pastry crust. The British originally created meat pies as a way to preserve and stretch expensive meat, with the pastry serving as both cooking vessel and edible container.
The American version of Beef Pot Pie typically features a bottom crust, though many home cooks simplify it with just a top crust. The filling combines braised or stewed beef with classic vegetables like carrots, peas, and potatoes, all bound together in a thick, savory gravy flavored with herbs and sometimes wine.
The texture should offer multiple contrasts in every bite. The pastry provides flaky, buttery crunch, while the filling delivers tender meat, soft vegetables, and silky gravy. When you cut into a properly made pot pie, the filling should be thick enough to hold its shape momentarily before the gravy flows slightly.
Traditional preparation involves cooking the beef filling separately from the crust, then assembling and baking them together. This two-stage process ensures the meat becomes fork-tender and the flavors develop fully before the final baking, which focuses on creating that golden, crispy pastry.
Beef Pot Pie differs from beef stew primarily through the addition of pastry and the thicker gravy consistency needed to prevent the crust from becoming soggy. The filling should be rich and hearty but not soupy, with just enough gravy to coat everything without pooling excessively.
Why You Will Love This Beef Pot Pie
First and foremost, Beef Pot Pie delivers unmatched comfort and satisfaction in a single dish. The combination of flaky pastry, tender meat, and vegetables creates a complete meal that warms you from the inside out on cold evenings.
The make-ahead friendly nature simplifies dinner planning significantly. You can prepare the filling a day or two in advance, then simply add the crust and bake when you’re ready to eat. This staged approach reduces stress and makes serving hot, homemade pot pie entirely manageable even on busy weeknights.
Beef Pot Pie also happens to be incredibly economical for feeding a crowd. Less expensive cuts of beef work beautifully in this dish because the long braising time breaks down tough connective tissue into tender, flavorful meat. One pie easily serves six to eight people, making the cost per serving remarkably low.
The versatility for different occasions makes this recipe valuable year-round. Serve it for casual family dinners, holiday gatherings, potluck contributions, or special Sunday suppers. The homestyle appeal works equally well for everyday meals and celebrations.
The impressive presentation belies the straightforward preparation. When you bring a golden Beef Pot Pie to the table, guests always react with delight and appreciation, yet the actual techniques require only basic cooking skills and patience.
The leftovers reheat beautifully, often tasting even better the next day as the flavors continue developing. The pastry won’t be quite as crisp when reheated, but the filling maintains its delicious quality for several days.
Finally, this dish provides an excellent way to use leftover roast beef or pot roast. Simply dice the cooked meat, add it to your gravy and vegetables, and you’ve transformed leftovers into an entirely new meal that feels special rather than repetitive.
Ingredients
For the Filling
| Ingredient | Amount | Notes |
|---|---|---|
| Beef chuck roast | 2 pounds | Cut into 1-inch cubes |
| All-purpose flour | 1/4 cup | For coating beef |
| Vegetable oil | 2 tablespoons | For browning meat |
| Yellow onion | 1 large, diced | Sweet onions work too |
| Carrots | 3 medium, diced | Peeled and cut into chunks |
| Celery | 2 stalks, diced | Adds aromatic depth |
| Garlic cloves | 3, minced | Fresh only, not jarred |
| Tomato paste | 2 tablespoons | Deepens flavor and color |
| Beef broth | 3 cups | Low-sodium preferred |
| Red wine | 1/2 cup | Optional but adds richness |
| Bay leaves | 2 | Remove before assembling |
| Fresh thyme | 4 sprigs | Or 1 teaspoon dried |
| Potatoes | 2 medium, diced | Yukon Gold hold shape well |
| Frozen peas | 1 cup | Add at the end |
| Salt and pepper | To taste | Season generously |
For the Pastry
| Ingredient | Amount | Notes |
|---|---|---|
| All-purpose flour | 2 1/2 cups | Plus extra for rolling |
| Cold unsalted butter | 1 cup (2 sticks) | Cut into small cubes |
| Ice water | 6-8 tablespoons | Keep very cold |
| Salt | 1 teaspoon | Enhances pastry flavor |
| Egg | 1, beaten | For egg wash on crust |
The quality of your beef dramatically impacts the final result of Beef Pot Pie. Chuck roast contains enough marbling to stay moist during cooking while developing deep flavor. Avoid lean cuts like sirloin, which turn dry and stringy in long-cooked dishes.
Cold butter is absolutely essential for flaky pastry. The cold fat creates steam pockets during baking that produce those desirable layers. Keep your butter refrigerated until the moment you need it, and work quickly to prevent it from warming up.
How to Make Beef Pot Pie Step by Step
Step 1: Brown the Beef and Build the Base
Pat the beef cubes completely dry with paper towels, then toss them with flour, salt, and pepper in a bowl until evenly coated. The flour creates a crust that browns beautifully and later thickens the gravy.
Heat the oil in a large Dutch oven or heavy pot over medium-high heat. Working in batches to avoid crowding, brown the beef cubes on all sides until they develop a deep golden-brown crust. This takes about 8 to 10 minutes per batch.
Transfer the browned beef to a plate and reduce the heat to medium. Add the diced onion, carrots, and celery to the pot, scraping up any browned bits stuck to the bottom. Cook these vegetables for 5 minutes until they begin to soften.
Add the minced garlic and tomato paste, stirring constantly for one minute until fragrant. The tomato paste should darken slightly and lose its raw smell. Pour in the red wine if using, and let it simmer for 2 minutes to cook off the alcohol.
Step 2: Braise the Beef Until Tender
Return the browned beef and any accumulated juices to the pot. Add the beef broth, bay leaves, and thyme sprigs. The liquid should almost cover the meat. Bring everything to a boil, then reduce to a gentle simmer.
Cover the pot and cook for 90 minutes, stirring occasionally, until the beef becomes fork-tender. You should be able to break apart a piece easily with a spoon when it’s ready.
Add the diced potatoes during the last 20 minutes of cooking so they become tender but don’t fall apart. Remove the pot from heat and discard the bay leaves and thyme sprigs.
Stir in the frozen peas and let the filling cool to room temperature. The Beef Pot Pie filling must cool completely before adding the pastry, or the heat will melt the butter and ruin the crust’s texture.
Step 3: Make the Pastry Dough
While the filling cools, prepare the pastry. Combine the flour and salt in a large bowl. Add the cold butter cubes and use a pastry cutter, two forks, or your fingertips to cut the butter into the flour until the mixture resembles coarse crumbs with pea-sized pieces.
Drizzle 6 tablespoons of ice water over the flour mixture and stir gently with a fork until the dough just begins to come together. Add more water one tablespoon at a time if the dough seems too dry.
Turn the dough onto a lightly floured surface and gather it into a ball. Divide the dough in half if making both top and bottom crusts, or keep it whole for just a top crust. Flatten each portion into a disk, wrap in plastic wrap, and refrigerate for at least 30 minutes.
This chilling period allows the gluten to relax and the butter to firm up, making the dough easier to roll and ensuring flaky layers in the baked crust.
Step 4: Assemble the Pot Pie
Preheat your oven to 400°F and position a rack in the lower third. If making a double-crust pie, roll out one disk of dough on a floured surface to about 1/8 inch thickness and fit it into a 9-inch deep-dish pie pan.
Pour the cooled Beef Pot Pie filling into the crust, making sure the gravy doesn’t overflow. Roll out the remaining dough for the top crust and drape it over the filling, pressing the edges to seal.
Trim any excess dough, leaving about a half-inch overhang. Fold the edges under and crimp decoratively. Cut several slits in the top crust to allow steam to escape during baking.
Brush the entire surface with beaten egg for a golden, glossy finish. Place the pie on a baking sheet to catch any drips, then transfer it to the preheated oven.
Step 5: Bake Until Golden and Bubbling
Bake the Beef Pot Pie for 45 to 55 minutes until the crust turns deep golden brown and you can see the filling bubbling through the vents. The pastry should look crisp and flaky, not pale or doughy.
If the edges brown too quickly, cover them with strips of aluminum foil or a pie shield for the remaining baking time. The center of the pie should reach 165°F on an instant-read thermometer.
Remove the pie from the oven and let it rest for at least 15 minutes before serving. This resting period allows the filling to thicken slightly and makes serving much neater. Cutting into a piping-hot pie results in a soupy mess.
Serve the pot pie hot, scooping generous portions that include plenty of crust, meat, vegetables, and gravy in each serving.
Storage and Make-Ahead Tips
Store leftover Beef Pot Pie covered in the refrigerator for up to four days. The pastry will soften during storage, but the filling maintains its delicious flavor. Reheat individual portions in a 350°F oven for 15 to 20 minutes until heated through.
For advance preparation, make the beef filling up to three days ahead and refrigerate it in a covered container. When ready to bake, bring the filling to room temperature, prepare the pastry, assemble, and bake as directed.
You can also freeze unbaked Beef Pot Pie for up to three months. Assemble the pie completely but don’t brush with egg wash. Wrap it tightly in plastic wrap and aluminum foil, then freeze. Bake from frozen, adding 20 to 30 minutes to the baking time and covering the edges to prevent burning.
Baked pot pie freezes reasonably well for up to two months, though the crust quality suffers somewhat. Wrap cooled pie tightly and freeze. Thaw overnight in the refrigerator, then reheat at 350°F until warmed through.
Prepare the pastry dough up to two days ahead and refrigerate it, or freeze it for up to three months. Thaw frozen dough overnight in the refrigerator before rolling it out.
The filling components can be prepped in advance too. Brown the meat and chop the vegetables the day before, storing them separately in the refrigerator. The next day, combine and braise as directed.
Common Mistakes and How to Fix Them
One frequent error involves not browning the beef properly before braising. Pale, steamed beef lacks the deep, caramelized flavor that browning provides through the Maillard reaction.
Take time to brown the beef in uncrowded batches over medium-high heat. Don’t rush this step or crowd the pan, as both prevent proper browning and create steam instead.
Another common mistake is adding the pastry to hot filling. The heat melts the butter in the dough, eliminating the cold fat pockets that create flaky layers.
Always let the filling cool to room temperature before assembling the pie. If you’re in a hurry, spread the filling in a shallow dish and refrigerate it for faster cooling.
Many people also make the error of not thickening the gravy sufficiently. Soupy filling makes the bottom crust soggy and creates a mess when you try to serve it.
The filling should be thick enough to coat a spoon heavily but still flow slightly. Simmer it uncovered for a few minutes if it seems too thin, or stir in a slurry of cornstarch and water.
Underbaking the Beef Pot Pie represents another pitfall. Pale, doughy crust tastes terrible and has an unpleasant texture that ruins the entire dish.
Bake until the crust is deep golden brown and the filling bubbles visibly through the vents. Use the egg wash for better browning and don’t be afraid to leave it in the oven until it looks properly baked.
Using warm or room temperature butter for the pastry creates tough, dense crust rather than flaky layers. The butter must remain cold and solid until it hits the oven heat.
Keep your butter refrigerated until you need it, work quickly, and refrigerate the dough if your kitchen is warm. Some bakers even freeze the butter cubes for extra insurance.
Finally, many cooks cut into the pie immediately after removing it from the oven. The filling needs time to thicken as it cools, and cutting too early creates a runny mess.
Let the Beef Pot Pie rest for at least 15 minutes before serving. The wait is difficult when it smells so good, but the improved serving experience is worth it.
Variations
The classic Beef Pot Pie welcomes numerous delicious variations. For beef and mushroom pot pie, add two cups of sliced mushrooms sautéed until golden brown. The earthy mushrooms add umami depth that complements the beef beautifully.
Use a mix of cremini and shiitake mushrooms for more complex flavor.
Guinness beef pot pie incorporates stout beer instead of red wine, creating a rich, malty flavor profile. The dark beer adds depth and slight bitterness that balances the rich gravy.
This Irish-inspired variation works particularly well for St. Patrick’s Day celebrations.
For individual pot pies, divide the filling among ramekins or small baking dishes and top each with a round of pastry. These personal pies look impressive, cook faster, and make portion control easy.
Bake them for 25 to 30 minutes until golden and bubbling.
Shepherd’s pie variation replaces the pastry with a layer of mashed potatoes spread over the beef filling. While technically a different dish, it offers similar comfort with less work.
Brush the potatoes with butter and broil briefly for a golden top.
Puff pastry pot pie uses store-bought puff pastry instead of homemade crust for a flakier, lighter top. The puff pastry rises dramatically and creates impressive height.
This shortcut saves time while still delivering beautiful results.
Vegetable-heavy pot pie increases the vegetable proportion by adding parsnips, turnips, or green beans. This creates a more balanced meal with additional nutrients and fiber.
The extra vegetables also stretch the expensive beef further.
Serving Suggestions
Beef Pot Pie works beautifully as a complete one-dish meal, but simple sides enhance the experience. Serve it with a crisp green salad dressed in tangy vinaigrette to cut through the richness.
The fresh, acidic greens provide perfect contrast to the heavy, savory pie.
Roasted or steamed green beans make an excellent accompaniment, adding color and a lighter vegetable element to the plate. Toss them with a bit of butter and garlic for extra flavor.
The tender-crisp texture provides nice contrast to the soft filling.
For a traditional British presentation, serve Beef Pot Pie with buttered peas and mashed potatoes on the side. While the pie already contains both ingredients, this traditional pairing creates an abundantly comforting meal.
Add some pickled onions or chutney for a tangy accent.
Crusty bread works wonderfully for soaking up any gravy that escapes when you cut into the pie. Warm the bread slightly and serve it with butter for a simple, satisfying addition.
The bread also helps stretch the meal to feed more people.
Red wine pairs beautifully with beef pot pie. Choose a medium-bodied red like Merlot, Côtes du Rhône, or Pinot Noir that complements the rich meat without overwhelming the dish.
Serve it at cool room temperature for the best flavor.
For casual family dinners, serve the Beef Pot Pie straight from the baking dish at the table. This homestyle presentation feels warm and inviting while keeping the pie hot throughout the meal.
Let everyone serve themselves generous portions.
Frequently Asked Questions
Can I use pre-made pie crust for Beef Pot Pie?
Yes, store-bought pie crust works perfectly and saves considerable time. Choose refrigerated pie dough rather than frozen shells for better quality and easier handling. Let refrigerated dough sit at room temperature for 10 minutes before unrolling to prevent cracking. The convenience makes pot pie accessible even on busy evenings.
What’s the best cut of beef for pot pie?
Chuck roast is ideal for Beef Pot Pie because it contains enough marbling to stay moist during braising while becoming fork-tender. Avoid lean cuts like sirloin or round, which turn dry and stringy. Short ribs or beef stew meat also work well. The key is choosing a cut with some fat that benefits from long, slow cooking.
How do I prevent a soggy bottom crust?
Ensure your filling is thick, not soupy, and completely cooled before adding it to the pastry. You can also brush the bottom crust with beaten egg white before adding the filling to create a moisture barrier. Baking the pie on the lower oven rack provides more bottom heat for crisping.
Can I make Beef Pot Pie without a bottom crust?
Absolutely, a top-crust-only pot pie is easier and still delicious. Place the filling directly in a baking dish and top with pastry, eliminating any soggy bottom crust concerns. This method also reduces calories and prep time while maintaining all the comfort food appeal.
How do I know when the pot pie is done baking?
The Beef Pot Pie is done when the crust turns deep golden brown and the filling bubbles visibly through the steam vents. An instant-read thermometer inserted through a vent should read 165°F in the center. The pastry should look crisp and flaky, never pale or doughy.
Can I freeze Beef Pot Pie?
Yes, freeze unbaked pot pie for up to three months for best results. Assemble completely but don’t brush with egg wash. Wrap tightly in plastic wrap and foil. Bake from frozen, adding 20 to 30 minutes to the baking time. You can also freeze baked pot pie, though the crust quality suffers slightly when reheated.
What vegetables work best in pot pie?
Traditional choices include carrots, peas, potatoes, onions, and celery. You can also add mushrooms, parsnips, turnips, or green beans. Avoid vegetables with high water content like zucchini or tomatoes, as they make the filling too soupy. Cut all vegetables to similar sizes for even cooking.
How thick should the gravy be?
The gravy should be thick enough to coat the back of a spoon heavily but still flow when tilted. It should be thicker than regular gravy but not paste-like. Remember that it will thicken slightly as it cools and sets. If too thin, simmer uncovered to reduce, or add a cornstarch slurry.
Can I use leftover roast beef?
Yes, leftover cooked beef works wonderfully in Beef Pot Pie. Skip the browning and braising steps. Simply dice the cooked beef, make the gravy separately with broth and flour, cook the vegetables until tender, then combine everything and proceed with assembling and baking. This approach transforms leftovers into an entirely new meal.
Making Beef Pot Pie from scratch fills your home with incredible aromas and brings genuine comfort to your dinner table. The combination of tender beef, hearty vegetables, rich gravy, and flaky pastry creates a meal that satisfies on every level.
Once you master these straightforward techniques, you’ll find yourself making pot pie whenever you want to treat your family to something special. The reliable results and universal appeal make this one of the most valuable recipes in your cooking repertoire.
Give this recipe a try this weekend, and discover why Beef Pot Pie has remained a beloved comfort food classic for generations. The homemade version surpasses anything you can buy and creates memories around your dinner table that last far longer than the meal itself.