
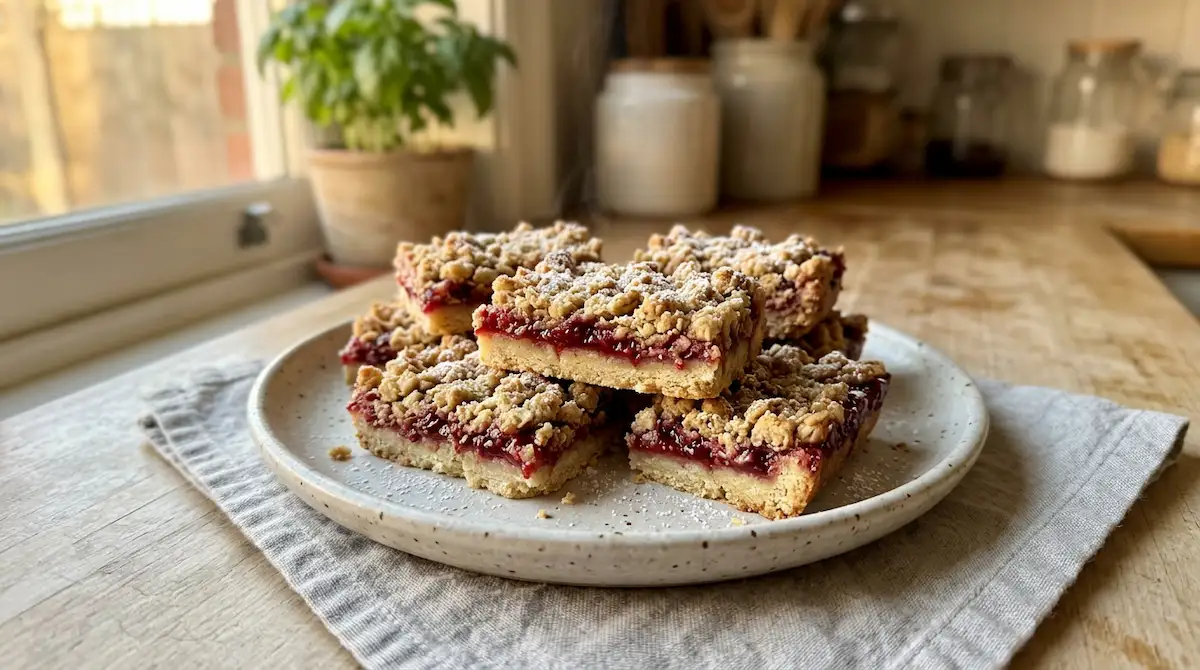
How to Make the Best Raspberry Bars in 5 Easy Steps
What happens when you combine a buttery shortbread crust with vibrant raspberry filling and a crumbly streusel topping? You get raspberry bars those irresistible dessert squares that disappear from cookie platters faster than you can refill them. These beautiful bars strike the perfect balance between sweet and tart, tender and crispy, simple and impressive, making them ideal for everything from casual weeknight treats to elegant party desserts.
Moreover, raspberry bars are remarkably forgiving and adaptable, welcoming ingredient substitutions and flavor variations while maintaining their essential charm. Whether you’re an experienced baker or just starting your baking journey, these bars deliver consistent, crowd-pleasing results that make you look like a professional pastry chef. Throughout this comprehensive guide, you’ll discover exactly how to create perfect raspberry bars with ideal texture, gorgeous layers, and that addictive combination of buttery richness and fruity brightness that keeps everyone coming back for more.
Table of Contents
What is Raspberry Bars
Raspberry bars are layered dessert squares featuring a buttery shortbread-style crust on the bottom, a sweet-tart raspberry filling in the middle, and typically a crumbly streusel or oat topping that adds textural contrast. Sometimes called raspberry crumble bars or raspberry oat bars, these treats belong to the family of fruit bars that transform simple ingredients into bakery-worthy desserts.
Furthermore, these bars occupy a delightful space between cookies and cake they’re portable and handheld like cookies but offer the satisfying density and layered complexity of cake. The shortbread base provides rich, buttery foundation that complements rather than competes with the bright raspberry flavor, while the crumbly topping adds visual appeal and textural interest.
Additionally, raspberry bars have roots in traditional American and European home baking, where seasonal fruit was preserved in jams and transformed into simple, satisfying desserts using pantry staples. Modern versions maintain that homestyle charm while offering flexibility in ingredients and techniques that accommodate different dietary needs and flavor preferences.
Why You Will Love This Raspberry Bars
First and foremost, the flavor combination of raspberry bars is absolutely timeless. The rich, buttery crust and topping provide neutral sweetness that allows the raspberry filling to shine with its characteristic sweet-tart brightness. Each bite delivers contrasting flavors that work together harmoniously, creating satisfaction that goes far beyond simple sweetness.
Additionally, these bars are incredibly practical for serving crowds. Unlike individual cookies that require portioning during baking, you make one large pan of bars and cut them into however many pieces you need. Therefore, raspberry bars work beautifully for potlucks, bake sales, holiday gatherings, and any occasion where you need to feed multiple people without spending all day in the kitchen.
Another compelling reason to master this recipe is its make-ahead friendly nature. You can bake the bars a day or two in advance without sacrificing quality they actually taste better after the flavors have time to meld overnight. This flexibility makes them perfect for busy schedules and advance party preparation.
Moreover, the visual appeal cannot be overstated. The layers create beautiful color contrast when you cut the bars, with golden crust, ruby-red filling, and golden-brown topping creating an attractive cross-section. These bars look professionally made and photograph beautifully, making them excellent choices for gift-giving and special occasions.
Finally, the ingredient flexibility means you can customize raspberry bars to match dietary needs or ingredient availability. Make them with fresh or frozen raspberries, substitute gluten-free flour, use coconut oil instead of butter for dairy-free versions, or adjust sweetness levels to your preference. The base recipe accommodates changes gracefully while maintaining its essential character.
Ingredients
Creating delicious raspberry bars requires simple ingredients that you likely already have in your pantry. Quality matters, particularly with the raspberries and butter, which form the flavor foundation.
Crust and Topping Ingredients
| Ingredient | Amount | Notes |
|---|---|---|
| All-purpose flour | 2½ cups | Measure by spooning into cup and leveling |
| Granulated sugar | ¾ cup | Divided between crust and topping |
| Unsalted butter | 1 cup (2 sticks), cold | Cut into cubes; keeps texture crumbly |
| Salt | ½ teaspoon | Enhances overall flavor balance |
| Baking powder | ½ teaspoon | Adds slight lift to topping |
| Vanilla extract | 1 teaspoon | Enhances buttery richness |
| Old-fashioned oats | ½ cup | Optional; adds texture to topping |
Raspberry Filling Ingredients
| Ingredient | Amount | Notes |
|---|---|---|
| Fresh or frozen raspberries | 3 cups | No need to thaw if frozen |
| Granulated sugar | ½ cup | Adjust based on berry sweetness |
| Cornstarch | 2 tablespoons | Thickens filling; tapioca works too |
| Lemon juice | 1 tablespoon | Brightens flavor and aids thickening |
| Lemon zest | 1 teaspoon | Optional; adds citrus brightness |
Optional Add-ins
| Ingredient | Amount | Notes |
|---|---|---|
| Almond extract | ¼ teaspoon | Complements raspberry beautifully |
| Cinnamon | ¼ teaspoon | Warm spice addition to topping |
| Sliced almonds | ⅓ cup | Mix into topping for crunch |
| Powdered sugar | For dusting | Elegant finishing touch |
The cold butter is crucial for creating that perfect crumbly, shortbread-like texture in both the crust and topping of raspberry bars. Cold butter creates distinct pockets that result in tender, flaky layers rather than dense, cakey texture. Don’t soften the butter use it straight from the refrigerator for best results.
Meanwhile, the raspberries provide that essential sweet-tart flavor and gorgeous color. Fresh raspberries at peak season deliver the most intense flavor, but frozen raspberries work beautifully year-round and often cost less. The cornstarch thickens the fruit juices released during baking, preventing soggy crust and ensuring clean-cutting bars.
How to Make Raspberry Bars Step by Step
Creating perfectly layered raspberry bars involves careful mixing and strategic baking techniques. Follow these detailed steps for consistently excellent results every single time.
Step 1: Prepare Pan and Make Crust
Preheat your oven to 375°F and line a 9×13-inch baking pan with parchment paper, leaving overhang on two sides for easy removal later. This simple step prevents sticking and makes cutting perfect bars effortless. In a large mixing bowl, combine 2 cups of flour, ½ cup sugar, and the salt. Cut the cold butter into small cubes and add it to the flour mixture.
Using a pastry cutter, two forks, or your fingers, work the butter into the flour until the mixture resembles coarse crumbs with some pea-sized butter pieces remaining. Don’t overmix those butter chunks create the tender, flaky texture that makes raspberry bars so delicious. Add the vanilla extract and mix just until the dough starts to come together when pressed.
Reserve 1½ cups of this crumb mixture for the topping and set it aside. Press the remaining mixture firmly and evenly into the bottom of your prepared pan, creating a compact crust that covers the entire bottom. Use the bottom of a measuring cup to press it smooth and even. This crust will be thin that’s exactly right.
Step 2: Prepare the Raspberry Filling
In a medium saucepan, combine the raspberries, ½ cup sugar, cornstarch, and lemon juice. If using frozen raspberries, add them straight from the freezer without thawing. Place the pan over medium heat and cook, stirring frequently, until the mixture comes to a simmer and thickens, about 5 to 7 minutes.
The raspberries will break down and release their juices, which the cornstarch will thicken into a jammy consistency. Continue cooking and stirring until the mixture becomes thick enough to coat the back of a spoon. This proper thickening prevents the filling from making your crust soggy and ensures the raspberry bars cut cleanly without falling apart.
Remove from heat and let the filling cool for about 5 minutes while you prepare the topping. This brief cooling prevents the hot filling from melting the butter in your crust and topping, which would compromise texture.
Step 3: Make and Add the Crumb Topping
To the reserved 1½ cups of crumb mixture, add the remaining ½ cup flour, ¼ cup sugar, baking powder, and the oats if using. Mix these dry ingredients together, then work in any remaining butter until you have a crumbly mixture with varied-sized pieces. Some fine crumbs and some larger clumps create the most interesting texture on top of your raspberry bars.
The oats add wonderful texture and a slightly nutty flavor that complements the raspberries beautifully. However, you can omit them if you prefer a more traditional shortbread-style topping. Either version tastes delicious and creates attractive bars.
If you’re adding sliced almonds or other mix-ins, fold them into the topping mixture now. These additions provide extra crunch and visual interest that make your bars look even more impressive.
Step 4: Assemble and Bake
Pour the slightly cooled raspberry filling over the crust in the pan, spreading it evenly to the edges with a spatula. The filling should completely cover the crust in a uniform layer. Then, scatter the crumb topping evenly over the raspberry filling, covering it as completely as possible. Don’t press the topping down just scatter it gently so it sits loosely on top.
This loose topping allows steam to escape during baking and creates those desirable crispy, golden bits. Place the pan in your preheated oven and bake for 35 to 40 minutes, until the topping turns golden brown and you can see the raspberry filling bubbling around the edges.
The raspberry bars are done when the topping looks set and golden, and the filling bubbles at the edges. Don’t underbake or the filling won’t set properly, but also avoid overbaking or the crust becomes too hard and the topping burns.
Step 5: Cool and Cut
Remove the pan from the oven and place it on a wire rack. Let the raspberry bars cool completely in the pan this is crucial and non-negotiable. The filling needs several hours to set completely, and cutting warm bars results in messy squares that fall apart and lose their beautiful layers.
For best results, let them cool at room temperature for at least 3 hours, or refrigerate for 1 to 2 hours if you’re in a hurry. Once completely cool, use the parchment paper overhang to lift the entire slab out of the pan onto a cutting board.
Using a sharp knife, cut into squares or rectangles of your desired size. Wipe the knife clean between cuts for the neatest edges. The bars should cut cleanly, revealing those gorgeous layers of crust, filling, and topping. Dust with powdered sugar if desired for an elegant finishing touch.
Storage and Make-Ahead Tips
Baked raspberry bars store beautifully in an airtight container at room temperature for up to 3 days. Layer them between sheets of parchment paper to prevent sticking and protect the crumbly topping. Keep the container in a cool, dry place away from direct sunlight or heat sources.
For longer storage, refrigerate the bars for up to 1 week. Refrigeration keeps the raspberry filling fresh and prevents any possibility of mold, though it can slightly firm up the crust and topping. Let refrigerated bars sit at room temperature for 20 minutes before serving to restore ideal texture.
Furthermore, raspberry bars freeze exceptionally well for up to 3 months. Wrap individual bars in plastic wrap, then place them in a freezer bag or container. Alternatively, freeze the entire uncut slab wrapped tightly in plastic and foil, then cut into portions after thawing. Thaw frozen bars overnight in the refrigerator or at room temperature for a few hours.
For make-ahead baking, prepare the bars completely up to 2 days before you need them. Store them covered at room temperature and cut just before serving for the freshest appearance. The flavors actually improve after a day as everything melds together beautifully.
Additionally, you can freeze the unbaked assembled bars. Prepare everything in the pan, cover tightly with plastic wrap and foil, and freeze for up to 2 months. Bake directly from frozen, adding 10 to 15 minutes to the baking time. This strategy gives you fresh-baked raspberry bars with minimal effort when you need them.
Common Mistakes and How to Fix Them
One of the most frequent errors when making raspberry bars is cutting them before they’ve cooled completely. Warm filling is still liquid and won’t hold its shape, resulting in messy, fallen-apart bars instead of neat squares. Always allow complete cooling at least 3 hours at room temperature or 1 to 2 hours in the refrigerator.
Another common mistake involves not thickening the raspberry filling adequately. If you skip cooking the filling or don’t cook it long enough, excess liquid will make your crust soggy and prevent clean cutting. Always simmer the filling until it’s thick and jammy, coating the back of a spoon.
Moreover, many people use butter that’s too warm when making the crust and topping. Soft or room-temperature butter creates greasy, dense texture instead of the tender, crumbly consistency you want. Always use cold butter straight from the refrigerator and work quickly to keep it from warming.
Furthermore, overbaking is a critical mistake that creates dry, hard bars instead of tender ones. Watch the bars carefully during the final 10 minutes of baking. Remove them when the topping just turns golden brown and the filling bubbles at the edges they’ll continue firming as they cool.
Finally, skipping the parchment paper lining makes removing raspberry bars from the pan nearly impossible without destroying them. Always line your pan with overhang on two sides. This simple step ensures you can lift out the entire slab cleanly for perfect cutting and presentation.
Variations
The basic raspberry bars recipe welcomes creative variations that keep this dessert interesting. For mixed berry bars, combine raspberries with blueberries, blackberries, or strawberries for complex fruit flavor. Use 3 cups total mixed berries and adjust sugar based on sweetness.
If you prefer a lemon-raspberry combination, add 2 tablespoons of lemon juice and 1 tablespoon of lemon zest to the filling. This creates bright, refreshing bars that taste like summer. The citrus complements raspberry beautifully without overpowering the delicate fruit flavor.
For chocolate-raspberry bars, add ½ cup of mini chocolate chips scattered over the filling before adding the crumb topping. The chocolate melts slightly during baking, creating pockets of rich sweetness that pair wonderfully with tart raspberries. This variation feels indulgent and special.
Additionally, create almond-raspberry raspberry bars by adding ½ teaspoon almond extract to the crust and mixing ½ cup sliced almonds into the topping. The nutty flavor and crunchy texture elevate these bars from simple to sophisticated, perfect for special occasions.
For a healthier version, replace half the all-purpose flour with whole wheat flour and reduce the sugar by ¼ cup. Add an extra ½ cup of oats to the topping for additional fiber and nutrition. While slightly denser than the classic version, these healthier bars still taste delicious.
Another popular variation uses jam instead of fresh or frozen berries. Spread 1½ cups of raspberry jam over the crust and skip the cooking step entirely. This shortcut version saves time while delivering excellent flavor, though the fruit flavor won’t be quite as bright and fresh.
Serving Suggestions
Raspberry bars shine as standalone desserts, but several serving ideas elevate them further. Serve squares warm with a scoop of vanilla ice cream for a simple but impressive dessert. The temperature contrast between warm bars and cold ice cream creates wonderful sensory appeal.
For brunch or afternoon tea, arrange these bars on a tiered stand alongside other pastries and finger sandwiches. Their vibrant color and elegant appearance make them natural centerpieces that draw attention and compliments.
Moreover, package raspberry bars in clear cellophane bags tied with ribbon for thoughtful homemade gifts. Stack 2 to 3 bars per bag and attach a recipe card. These personal gifts show care and effort while remaining budget-friendly and universally appreciated.
Additionally, serve these bars as part of a dessert buffet at parties and celebrations. Their bright color provides visual contrast to chocolate desserts and vanilla cakes, creating a more interesting and appealing spread.
For coffee service, pair raspberry bars with strong coffee or espresso. The fruity brightness cuts through coffee’s bitterness beautifully, while the buttery crust complements rich, dark roasts. This pairing works wonderfully for morning meetings or afternoon breaks.
Furthermore, crumble leftover bars over yogurt parfaits or oatmeal for a special breakfast treat. The fruit, buttery crumbs, and creamy yogurt create layers of flavor and texture that transform ordinary breakfast into something memorable.
Frequently Asked Questions
Can I use raspberry jam instead of fresh raspberries?
Yes! Use 1½ cups of raspberry jam and skip the cooking step. Spread the jam directly over the crust and top with the crumb mixture. The texture will be slightly different but still delicious, and this shortcut saves considerable time.
Why are my raspberry bars soggy?
Soggy bars typically result from not cooking the filling long enough to thicken it properly, or cutting them before they’ve cooled completely. Always simmer the filling until thick and jammy, and wait at least 3 hours before cutting.
Can I make raspberry bars gluten-free?
Absolutely! Replace the all-purpose flour with a 1:1 gluten-free flour blend designed for baking. The texture will be slightly different but still excellent. Make sure all other ingredients are certified gluten-free.
How do I prevent the topping from sinking into the filling?
Let the cooked filling cool for 5 to 10 minutes before spreading it on the crust. This slight cooling firms it up enough that the topping sits on top rather than sinking. Also, scatter the topping gently without pressing it down.
Can I use frozen raspberries for raspberry bars?
Yes! Frozen raspberries work beautifully and don’t need thawing. Add them frozen directly to the saucepan when making the filling. They’ll release slightly more liquid than fresh, so cook the filling a bit longer until properly thickened.
How far in advance can I bake raspberry bars?
Bake raspberry bars up to 2 days ahead and store at room temperature in an airtight container. For longer storage, refrigerate for up to 1 week or freeze for up to 3 months. The flavor actually improves after a day.
What’s the best pan for making raspberry bars?
A 9×13-inch metal or glass baking pan works perfectly. Metal conducts heat more efficiently and creates slightly crispier edges, while glass bakes more gently. Either produces excellent results choose based on what you have.
Why did my crust turn out hard instead of tender?
Hard crust typically results from using butter that’s too warm, overmixing the dough, or overbaking. Use cold butter, mix just until combined, and remove from the oven as soon as the topping turns golden brown.
Baking perfect raspberry bars proves that impressive desserts don’t require complicated techniques or exotic ingredients. With just a few pantry staples and some fresh or frozen raspberries, you create beautiful layered treats that look professionally made and taste absolutely delicious.
These versatile bars work for any occasion from casual family dinners to elegant celebrations and their make-ahead friendly nature makes them practical choices for busy schedules. The combination of buttery shortbread, bright raspberry filling, and crumbly topping creates timeless appeal that never goes out of style.
So gather your ingredients, line that baking pan, and discover just how easy and rewarding it is to create bakery-worthy raspberry bars in your own kitchen. Once you experience how simple they are to make and how much everyone loves them, these bars will become a regular feature in your baking rotation throughout the year.