
How to Make the Best Thumbprint Cookies with Jam in 5 Simple Steps
Can anything beat the charm of a homemade cookie with a jewel-toned center of glistening jam? Thumbprint cookies with jam combine buttery, melt-in-your-mouth shortbread with pockets of sweet fruit preserves to create treats that look elegant enough for gifting yet simple enough for weeknight baking. These classic cookies earn their name from the gentle indent you press into each ball of dough a satisfying hands-on step that makes baking feel personal and fun.
Moreover, thumbprint cookies with jam are endlessly versatile, welcoming different jams, nuts, and flavor additions that let you customize them for any occasion or preference. Whether you’re baking for holiday cookie exchanges, afternoon tea parties, or simply treating yourself to something sweet and beautiful, these beloved cookies deliver every time. Throughout this comprehensive guide, you’ll discover exactly how to create bakery-perfect thumbprint cookies with jam with tender texture, gorgeous appearance, and that ideal balance of buttery richness and fruity brightness.
Table of Contents
What is Thumbprint Cookies with Jam
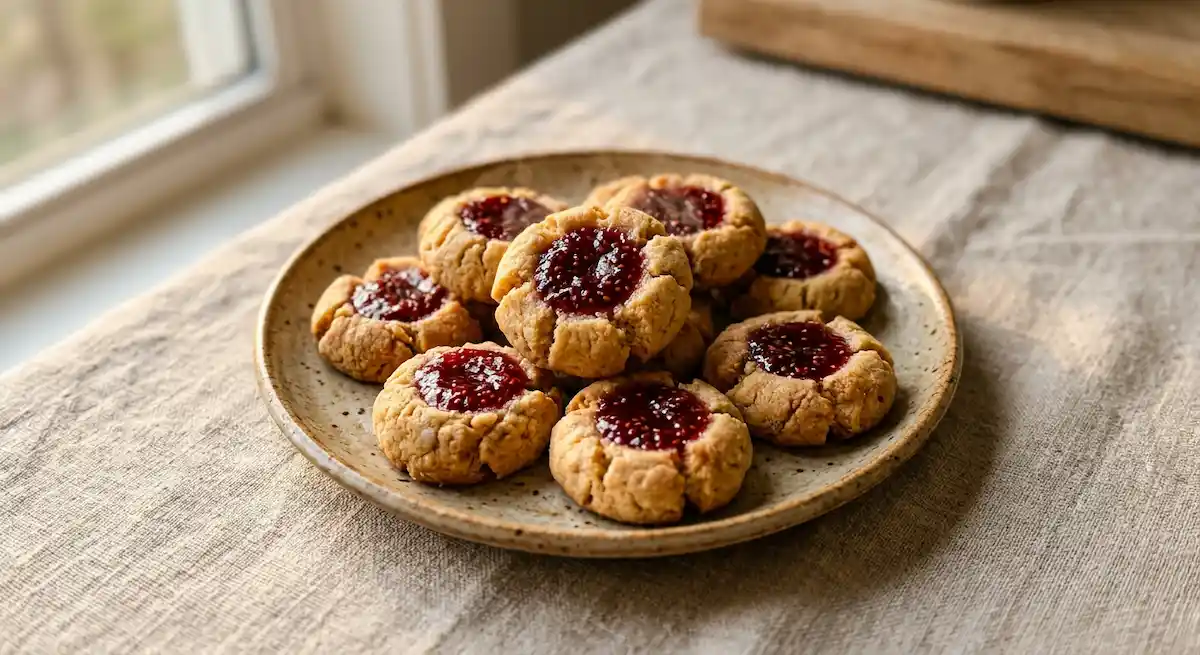
Thumbprint cookies with jam are small, round shortbread-style cookies featuring an indentation in the center filled with fruit jam or preserves. The name comes from the traditional method of creating the indent pressing your thumb gently into each ball of dough before baking. This simple technique creates a perfect well that holds the jam filling, which glistens beautifully once baked and creates an appealing contrast between the golden cookie and colorful fruit center.
Furthermore, these cookies belong to the shortbread family, meaning they’re made with a high ratio of butter to flour, resulting in a tender, crumbly texture that practically melts on your tongue. Unlike chewy cookies that rely on eggs and leavening, thumbprint cookies achieve their characteristic texture through butter, creating a rich foundation that pairs perfectly with tart-sweet jam.
Additionally, thumbprint cookies with jam have roots in European baking traditions, particularly Scandinavian holiday cookies. They’ve become beloved worldwide for their combination of simplicity and elegance the recipe requires no special equipment or advanced techniques, yet the finished cookies look professionally made and taste absolutely delicious. The gentle sweetness of the cookie balances beautifully with the fruity jam, creating harmony in every bite.
Why You Will Love This Thumbprint Cookies with Jam
First and foremost, the flavor combination of buttery shortbread and fruity jam is absolutely timeless. The rich, vanilla-scented cookie provides a perfect neutral canvas that allows the bright, sweet-tart jam to shine. Each bite delivers contrasting flavors that complement rather than compete, creating satisfaction that keeps you reaching for just one more cookie.
Additionally, these cookies are remarkably forgiving for bakers of all skill levels. The dough is easy to work with, doesn’t require rolling pins or cookie cutters, and shapes beautifully with just your hands. Therefore, even beginning bakers can achieve gorgeous results that look impressive and taste professional.
Another compelling reason to master this recipe is its make-ahead friendly nature. You can prepare the dough days in advance, freeze shaped cookies before baking, or bake and store finished cookies for weeks. This flexibility makes thumbprint cookies with jam perfect for holiday baking when you’re juggling multiple recipes and need strategies that save time without sacrificing quality.
Moreover, the visual appeal cannot be overstated. These cookies are genuinely beautiful with their golden edges, tender centers, and jewel-like jam fillings in ruby red, deep purple, or golden apricot. They look stunning on cookie platters, in gift boxes, or simply arranged on a plate for afternoon tea. The professional appearance belies how simple they actually are to make.
Finally, the customization possibilities mean you never get bored. Change the jam flavor with each batch, add nuts or chocolate, incorporate different extracts, or create assortments with multiple jam colors. This versatility keeps thumbprint cookies with jam interesting and allows you to adapt them to different occasions, seasons, and personal preferences.
Ingredients
Creating tender, flavorful thumbprint cookies with jam requires quality ingredients that work together to produce that characteristic melt-in-your-mouth texture. Simple doesn’t mean boring—each component plays an important role.
Cookie Dough Ingredients
| Ingredient | Amount | Notes |
|---|---|---|
| Unsalted butter | 1 cup (2 sticks), softened | Must be room temperature for proper creaming |
| Granulated sugar | ⅔ cup | Creates tender texture and mild sweetness |
| Egg yolks | 2 large | Adds richness; save whites for coating |
| Vanilla extract | 2 teaspoons | Pure extract tastes noticeably better |
| Almond extract | ½ teaspoon | Optional but adds wonderful depth |
| All-purpose flour | 2 cups | Measure properly by spooning into cup |
| Salt | ¼ teaspoon | Enhances overall flavor balance |
Coating and Filling Ingredients
| Ingredient | Amount | Notes |
|---|---|---|
| Egg whites | 2 large | From separated eggs; for coating |
| Finely chopped nuts | 1 cup | Walnuts, pecans, or almonds all work |
| Fruit jam or preserves | ½ cup | Use your favorite flavors |
| Powdered sugar | For dusting (optional) | Adds elegant finish |
Optional Flavor Variations
| Ingredient | Amount | Notes |
|---|---|---|
| Lemon zest | 1 teaspoon | Brightens flavor beautifully |
| Cocoa powder | 2 tablespoons | For chocolate cookies; reduce flour by 2 tbsp |
| Cinnamon | ½ teaspoon | Warm spice addition |
| Mini chocolate chips | For filling instead of jam | Fun variation |
The butter forms the foundation of thumbprint cookies with jam, providing that essential richness and tender, crumbly texture that makes these cookies special. Room-temperature butter creams properly with sugar, incorporating air that creates light texture despite the lack of chemical leavening.
Meanwhile, using only egg yolks rather than whole eggs creates extra richness and tenderness while keeping the cookies delicate. The separated egg whites serve double duty as the coating that helps nuts adhere beautifully to each cookie’s exterior, creating textural contrast and visual appeal.
How to Make Thumbprint Cookies with Jam Step by Step
Creating perfect thumbprint cookies with jam involves careful mixing and shaping techniques that ensure tender texture and beautiful appearance. Follow these detailed steps for consistently excellent results.
Step 1: Cream Butter and Sugar
Preheat your oven to 350°F and line two baking sheets with parchment paper or silicone baking mats. In a large mixing bowl, beat the softened butter and granulated sugar together using an electric mixer on medium speed for about 3 minutes. The mixture should become light and fluffy, increasing slightly in volume as you beat air into it.
This creaming step is crucial because it creates the tender, melt-in-your-mouth texture that defines excellent thumbprint cookies with jam. Don’t rush it properly creamed butter and sugar makes all the difference. Add the egg yolks, vanilla extract, and almond extract if using, then beat again until everything is completely incorporated and the mixture looks smooth and creamy.
The dough should be pale yellow and fluffy at this stage. Scrape down the sides of the bowl to ensure even mixing, catching any butter or sugar that might be stuck to the edges.
Step 2: Mix in Flour and Chill
Add the flour and salt to the butter mixture. Mix on low speed just until the flour disappears and a soft dough forms. Don’t overmix or your cookies will become tough stop as soon as no white streaks of flour remain visible. The dough will be soft and slightly sticky, which is exactly what you want.
Cover the bowl with plastic wrap and refrigerate the dough for at least 30 minutes, or up to 2 hours. This chilling step is important because it firms up the butter, making the dough easier to handle and shape. Cold dough also spreads less during baking, helping your thumbprint cookies with jam maintain their round shape and distinct edges.
While the dough chills, prepare your coating station. Beat the egg whites in a shallow bowl until frothy. Place the finely chopped nuts in another shallow bowl. These two bowls will become your assembly line for coating the cookies before baking.
Step 3: Shape and Coat the Cookies
Remove the chilled dough from the refrigerator. Roll portions of dough into balls about 1 inch in diameter roughly the size of a walnut. A small cookie scoop makes this job easier and ensures uniform sizing, which means even baking.
Roll each ball first in the beaten egg whites, coating it completely. Let excess egg white drip back into the bowl, then roll the ball in the chopped nuts, pressing gently so the nuts adhere well. Place the coated balls on your prepared baking sheets, spacing them about 2 inches apart to allow for slight spreading.
Once all cookies are shaped and coated, use your thumb, the back of a small spoon, or a rounded measuring spoon to press a deep indent into the center of each cookie. Make the indent fairly deep about halfway through the cookie because it will shallow slightly during baking. Don’t be timid or you’ll end up with barely visible wells that won’t hold enough jam.
Step 4: Bake the Cookies
Place the baking sheets in your preheated oven and bake for 10 minutes. The cookies should look set but not browned yet. Remove them from the oven and use the back of a small spoon to gently re-press the indents, which often puff up slightly during initial baking. This second pressing creates deeper, more defined wells for the jam.
Return the cookies to the oven and bake for another 5 to 7 minutes, until the edges just barely start to turn golden. The thumbprint cookies with jam should still look quite pale overall you want tender cookies, not crispy or browned ones. Total baking time is typically 15 to 17 minutes.
Remove the cookies from the oven and let them cool on the baking sheets for 5 minutes. They’ll be quite fragile when hot, so this resting period allows them to firm up enough for safe handling. After 5 minutes, carefully transfer them to a wire rack to cool completely.
Step 5: Fill with Jam
Once the cookies are completely cool, fill each indent with about ½ to ¾ teaspoon of jam. Use a small spoon or a piping bag with a small round tip for precise filling. Don’t overfill or the jam will run over the edges you want a jewel-like pool of jam that sits neatly in the indent.
You can fill the cookies immediately after they cool, or wait until serving time. Some bakers prefer filling the cookies while they’re still slightly warm so the jam melts and settles into the indent beautifully. Others fill cooled cookies right before serving to keep the jam fresh and vibrant.
For the prettiest presentation, use jams with intense colors raspberry, strawberry, apricot, and blueberry all create stunning visual appeal. Mix different jam flavors in a single batch for a colorful assortment that looks professional and offers variety.
Storage and Make-Ahead Tips
Baked and filled thumbprint cookies with jam store beautifully in an airtight container at room temperature for up to 1 week. Layer them between sheets of parchment paper to prevent sticking and protect the jam centers. Keep the container in a cool, dry place away from direct sunlight, which can fade the jam’s vibrant colors.
For longer storage, freeze unfilled baked cookies for up to 3 months. Arrange them in a single layer on a baking sheet and freeze until solid, then transfer to a freezer bag or container. Thaw at room temperature for 30 minutes, then fill with jam right before serving. This method keeps the jam fresh and prevents it from making the cookies soggy during storage.
Furthermore, you can freeze the cookie dough itself for ultimate convenience. Shape the dough into balls, coat them with egg white and nuts, and freeze them on a baking sheet. Once solid, transfer to a freezer bag and store for up to 3 months. Bake directly from frozen, adding 2 to 3 minutes to the baking time. Press the indents before baking as directed.
Additionally, prepare the dough up to 3 days in advance and refrigerate it until ready to bake. Bring it to room temperature for about 15 minutes before shaping to make handling easier. This strategy spreads out your baking tasks and reduces last-minute holiday stress.
For gifting, arrange thumbprint cookies with jam in decorative tins or boxes lined with parchment paper. They ship well and maintain their quality for several days, making them perfect for sending to distant friends and family. Just make sure to pack them carefully with crumpled parchment or tissue between layers to prevent shifting.
Common Mistakes and How to Fix Them
One of the most frequent errors when making thumbprint cookies with jam is using butter that’s too soft or melted. Butter should be room temperature soft enough to indent when pressed but still holding its shape. Overly soft butter creates greasy dough that spreads too much during baking, resulting in flat, misshapen cookies.
Another common mistake involves not making the thumb indent deep enough. First-time bakers often press too gently, creating shallow indents that almost disappear during baking. Press firmly, creating an indent that goes about halfway through the cookie. Remember that you’ll press again halfway through baking to maintain depth.
Moreover, many people overfill the cookies with jam. While it’s tempting to add generous amounts, too much jam causes overflow that makes the cookies sticky and messy. Use about ½ teaspoon per cookie just enough to create a glossy, jewel-like center without spilling over the edges.
Furthermore, overbaking is a critical mistake that creates dry, crumbly cookies instead of tender, melt-in-your-mouth ones. Thumbprint cookies with jam should look quite pale when you remove them from the oven, with only the slightest golden tinge around the edges. They firm up as they cool, so don’t wait for them to look completely set in the oven.
Finally, filling the cookies while they’re still hot causes the jam to become overly liquid and run everywhere. Always let cookies cool completely before filling, or at most fill them when they’re just slightly warm. This ensures the jam sets properly and creates that beautiful, glossy appearance.
Variations
The classic thumbprint cookies with jam recipe welcomes creative variations that keep this favorite cookie interesting. For chocolate lovers, replace ¼ cup of flour with cocoa powder to create chocolate thumbprint cookies. Fill them with raspberry or cherry jam for a chocolate-covered-cherry effect that’s absolutely divine.
If you prefer nut-free versions, skip the chopped nut coating and roll the cookies in coarse sugar instead. This creates a sparkly, crystalline exterior that’s equally beautiful and adds pleasant textural crunch without nuts. Use colored sugar during holidays for festive appearances.
For lemon thumbprint cookies, add 1 tablespoon of lemon zest to the dough and use lemon curd instead of jam. The bright citrus flavor creates a refreshing variation that’s perfect for spring and summer gatherings. Dust with powdered sugar after filling for an elegant finish.
Additionally, create filled variations by using Nutella, dulce de leche, or caramel instead of jam. These rich, creamy fillings create indulgent cookies that feel special and luxurious. Top with a sprinkle of sea salt for a sweet-salty combination that’s incredibly addictive.
For a sophisticated adult version, add 1 teaspoon of finely ground espresso powder to the dough and fill with coffee-flavored jam or chocolate ganache. This creates elegant cookies perfect for after-dinner treats with coffee or dessert wine.
Another popular variation uses different nut coatings. Try pistachios for beautiful green color, hazelnuts for rich flavor, or almonds for classic taste. Each nut creates a different flavor profile while maintaining that characteristic thumbprint cookies with jam appearance and texture.
Serving Suggestions
Thumbprint cookies with jam shine on holiday cookie platters arranged alongside other classic treats like sugar cookies, gingerbread, and shortbread. Their colorful jam centers add visual interest to any assortment, making the entire platter more appealing and festive.
For afternoon tea or coffee service, arrange these cookies on a tiered stand with small sandwiches and scones. The elegant appearance and delicate size make them perfect for refined gatherings where presentation matters as much as taste.
Moreover, package thumbprint cookies with jam in clear cellophane bags tied with ribbon for beautiful homemade gifts. Stack 6 to 8 cookies in each bag, arranging them so the jam centers are visible. These thoughtful gifts show care and effort while remaining budget-friendly.
Additionally, serve these cookies as part of a cookie exchange where each participant brings a dozen of their favorite variety. The thumbprint cookies with jam always stand out for their beauty and universal appeal, making them excellent exchange contributions that everyone loves.
For children’s parties, let kids help make the thumbprint indents they love the hands-on nature of pressing their actual thumbs into the dough. Create an assortment with different colored jams so kids can choose their favorite flavors.
Furthermore, pair these buttery cookies with champagne or sparkling wine for sophisticated celebrations. The mild sweetness and fruity jam complement bubbly drinks beautifully, creating an elegant pairing for toasts and special occasions.
Frequently Asked Questions
Can I use store-bought jam for thumbprint cookies?
Absolutely! Store-bought jam works perfectly for thumbprint cookies with jam. Choose high-quality preserves with visible fruit pieces for best flavor and appearance. Seedless varieties create smoother centers, while seed-in versions add rustic charm and texture.
Why did my thumbprint indents disappear during baking?
Indents often shallow during baking, which is why the recipe includes pressing them again halfway through. Make your initial indents quite deep about halfway through the cookie and press firmly the second time to maintain well depth.
Can I make thumbprint cookies without eggs?
Yes, though the texture will differ slightly. Replace the egg yolks with 2 tablespoons of milk or cream. For coating, use milk instead of egg whites the nuts won’t adhere quite as well, but they’ll still stick sufficiently.
What’s the best jam flavor for thumbprint cookies with jam?
Raspberry and strawberry are traditional favorites, but any flavor you love works beautifully. Apricot, blueberry, cherry, and fig all create delicious variations. Mix multiple flavors in one batch for a colorful, varied assortment.
How do I prevent my cookies from spreading too much?
Ensure your butter is properly softened (not too soft or melted), chill the dough adequately before shaping, and don’t overbake. Also, make sure your oven temperature is accurate—too-hot ovens cause excessive spreading.
Can I fill the cookies before baking?
While possible, filling before baking often causes the jam to bubble, caramelize, or sink into the cookie. Filling after baking gives you better control over appearance and prevents the jam from overcooking or losing its fresh flavor.
How far in advance can I bake thumbprint cookies?
Bake unfilled cookies up to 1 week ahead and store in airtight containers. Fill them 1 to 2 days before serving for best appearance and texture. The jam stays fresh-looking and doesn’t have time to make the cookies soggy.
Why are my cookies crumbly instead of tender?
Crumbly texture typically results from too much flour, overbaking, or insufficient butter. Measure flour by spooning it into the measuring cup rather than scooping, and remove cookies from the oven while they’re still quite pale.
Baking thumbprint cookies with jam connects you to generations of home bakers who have relied on this simple, beautiful recipe for special occasions and everyday treats alike. The combination of buttery shortbread and fruity jam creates timeless appeal that never goes out of style, while the simple technique ensures success even for beginning bakers.
These versatile cookies adapt beautifully to your preferences, welcoming different jams, nuts, and flavor additions that keep them interesting batch after batch. Whether you’re baking for holiday celebrations, afternoon gatherings, or simply treating yourself to something homemade and delicious, these beloved cookies deliver satisfaction in every tender, jam-filled bite.
So gather your ingredients, warm that butter to room temperature, and discover the simple joy of creating beautiful thumbprint cookies with jam in your own kitchen. Once you experience how easy and rewarding they are to make, you’ll understand why they’ve remained beloved favorites for so many years.